- Domains
- DNS Management
- Content Delivery Network
-
Cloud Containers
- Overview
-
Using Containers
- Creating and Managing
- Connecting to a Container
- Swapping the Image
- Domain Aliases
- Environment Variables
- Protected Environment Variables
- Backing Up
- Automatic Updates
- SSL Support
- Adjusting Execution Time Limits
- Upgrading Apache Image
- Renaming a Container
- Port Management
- Caching
- Cloning/Overwriting
- Restoring a Backup
- Production Mode
- Metrics Dashboard
- Accessing supervisord
- Container Deprecation
- SSH / SFTP Users
- Databases
- Volumes
- Custom Images
-
Technical Guides
- Create a NodeJS Container
- Creating a Service Container
- Working with .NET Core Web Containers
- Working with Node.js Web Containers
- Working with Umbraco Web Containers
- Deploying your application with git
- Python Container
- Enable Country-Level blocking in Cloud Containers
- Working with SQL Server Containers
- Working with the SilverStripe Caching folder
- Profiling a site using Xdebug on Cloud Containers
- Working with SilverStripe Containers
- NGINX Proxy for Service Containers
- Tuning PHP OPcache
- Deploying phpList on SiteHost Cloud Containers
- Deploying Mautic on SiteHost Cloud Containers
- Deploying n8n on SiteHost Cloud Containers
- Working with ModSecurity on Apache+PHP containers
- Low Disk Warnings & Upgrades
- Local Development
- Virtual Servers
- Dedicated Servers
- Private Cloud
- Cloud / Shared Hosting
- Email Hosting
- Monitoring & Bandwidth
- Account & Billing
- Developers
- SSL Certificates
- Networking
- AI Platform
DNS Records
DNS Records are the main contents of a DNS Zone file and are used to map domains to IP addresses and hosts. There are different types of DNS Records supported by the SiteHost Control Panel. These include:
- A Record - Address Record. This assigns an IP address to a domain or sub-domain name.
- AAAA Record - An IPv6 address record mapping a hostname to a 128-bit IPv6 address.
- CNAME Record - Canonical Name record makes one domain name an alias of another. The aliased domain gets all the sub-domains and DNS records of the original. You should use a CNAME record whenever you want associate a new sub-domain to an already existing A record. This way you would only need to change the IP linked with an A record only once, and all CNAME's would then automatically update (as opposed to having to change the IP against multiple records).
- MX Record - Mail eXchange record. This maps a domain name to a list of mail servers for that domain.
- TXT Record - A TXT record allows human or machine-readable text to be inserted into a DNS record.
- SRV Record - Service Locator. Used for newer protocols, instead of creating protocol-specific records such as MX. The format for SRV records to use in SiteHost Control Panel should be as follows:
_service._proto SRV weight port target.
Managing DNS Zones
Follow these steps to manage DNS Records for a specific Zone:
- Log in to the SiteHost Control Panel.
- Select the DNS Zones module from the left menu.
- Select the Zone to manage from the list of DNS zones.
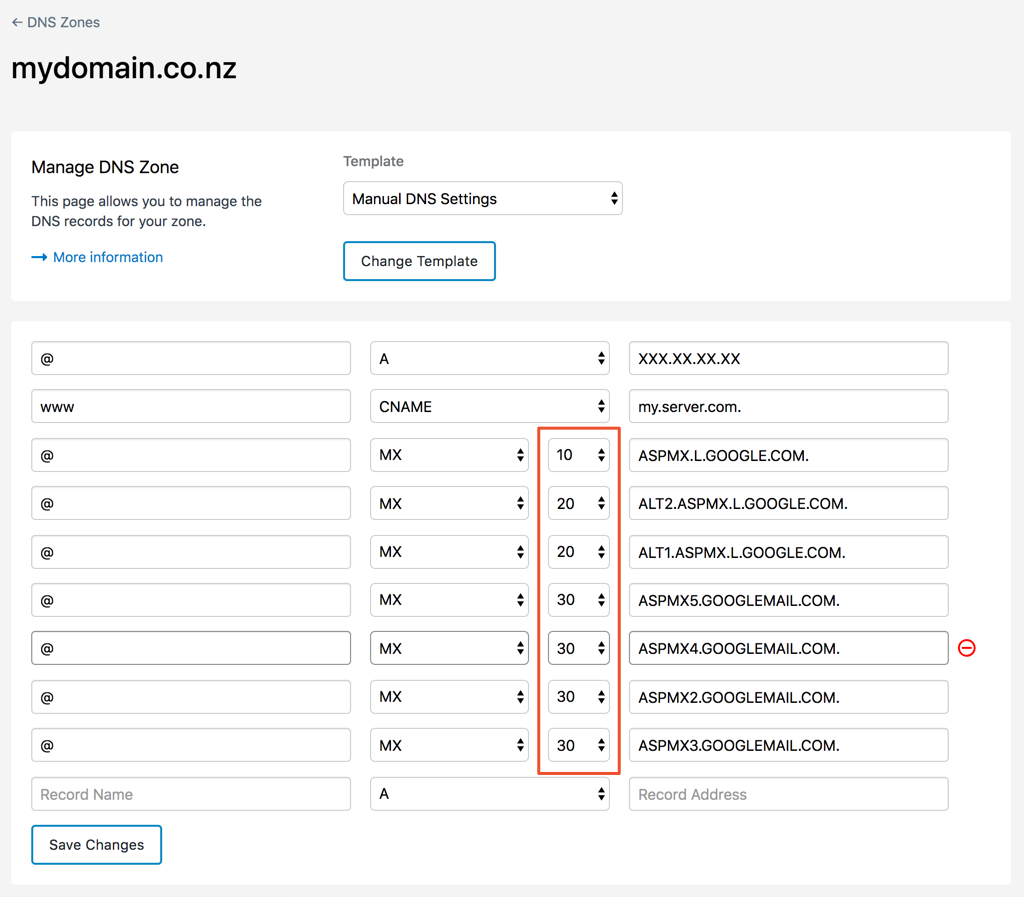
- Ensure that Manual DNS Settings is the Template selected for the Zone - otherwise the DNS Records will be read-only.
- Add new records in the last row, new rows will be auto-added.
- Hover over an existing row to delete a record using the red button on the right (see screenshot).
- Use the supplied dropdown to change record priority (see screenshot).
- Select Save Changes to confirm the changes to the zone file.
- Keep in mind that DNS changes need to propagate, which can take anywhere from several minutes up to 72 hours. This is discussed further below.
Frequently Asked Questions
Why aren't my DNS changes working yet?
When you make a DNS change, it takes time for the changes to take effect world wide. This is called DNS propagation. It is the time it takes for DNS servers around the globe to refresh their cache.
Can I check the current status of my domain?
Before the propagation completes, you can check your DNS settings by running the dig command for your domain name against one of your domain's nameservers e.g.
dig example.co.nz @ns1.sitehost.co.nzTo check the DNS propagation status world wide you can use tools like DNS Checker and What's My DNS?.
Can I speed up the propagation process?
It is possible to apply a level of control to DNS propagation by defining how long DNS servers cache the DNS record for. This is done by defining the TTL (Time-to-live) against the domain's zone file. By default SiteHost sets the TTL as 3600 - which is 3600 seconds, or 60 minutes. You can drop this all the way down to 60 seconds if required. Obviously, altering the TTL will only help to reduce propagation time if it is implemented well in advance of any changes to the DNS records.
To alter the TTL on a domain's zone:
- Log in to the SiteHost Control Panel.
- Click the DNS Zones module from the menu on the left.
- Select the Zone you want to alter the TTL for.
- Check the Advanced Settings section above the list of DNS records.
- Alter the TTL field value. This can be set as low as 60. We recommend you put it back to 3600 when your need for higher refreshes is over.
- Click Save Changes button in the Advanced Settings section.
Can I edit more than just the TTL for the SOA record?
Editing an SOA record can have unintended consequences if you're not familiar with the impact your changes may have. As a precautionary measure, we've chosen to disable editing of SOA record values (aside from TTL) to prevent any unintended outages that may arise from a misconfigured record.
If you do need to edit your SOA record, you can reach out to our support team by opening a ticket in the Control Panel.
Why are my DNS changes not working even after they should have propagated?
When adding records to the SiteHost Control Panel, the base domain will be added on to the label so only the sub domain is needed. This means that instead of the label being the full www.example.com, you will only include www. If the record label would otherwise be empty, then you simply use the @ symbol, as shown in the above screenshot.