- Domains
- DNS Management
- Content Delivery Network
-
Cloud Containers
- Overview
-
Using Containers
- Creating and Managing
- Connecting to a Container
- Swapping the Image
- Domain Aliases
- Environment Variables
- Protected Environment Variables
- Backing Up
- Automatic Updates
- SSL Support
- Adjusting Execution Time Limits
- Upgrading Apache Image
- Renaming a Container
- Port Management
- Caching
- Cloning/Overwriting
- Restoring a Backup
- Production Mode
- Metrics Dashboard
- Accessing supervisord
- Container Deprecation
- SSH / SFTP Users
- Databases
- Volumes
- Custom Images
-
Technical Guides
- Create a NodeJS Container
- Creating a Service Container
- Working with .NET Core Web Containers
- Working with Node.js Web Containers
- Working with Umbraco Web Containers
- Deploying your application with git
- Python Container
- Enable Country-Level blocking in Cloud Containers
- Working with SQL Server Containers
- Working with the SilverStripe Caching folder
- Profiling a site using Xdebug on Cloud Containers
- Working with SilverStripe Containers
- NGINX Proxy for Service Containers
- Tuning PHP OPcache
- Deploying phpList on SiteHost Cloud Containers
- Deploying Mautic on SiteHost Cloud Containers
- Deploying n8n on SiteHost Cloud Containers
- Working with ModSecurity on Apache+PHP containers
- Low Disk Warnings & Upgrades
- Local Development
- Virtual Servers
- Dedicated Servers
- Private Cloud
- Cloud / Shared Hosting
- Email Hosting
- Monitoring & Bandwidth
- Account & Billing
- Developers
- SSL Certificates
- Networking
- AI Platform
Navigation
Options
Clear History
Developers
Forge on SiteHost
Forge on SiteHost
Don't want to install, maintain and configure your web server? Don't have enough time or knowledge about system administration? Forge from Laravel might be for you then. Starting at $12 USD a month you can have a nice and easy interface to deploy and maintain your websites.
When Forge is installed on your server it sets up Nginx, PHP, MySQL, Postgres, Redis and Memcache by default. It also allows you to run/configure your own daemons plus schedule actions directly from the web interface. Hassle free!
Requirements
You will need:
- A Linux VPS running latest version of Ubuntu.
- A Github account (Free).
- A Forge account (From $12 USD / month).
Setup
Please follow these steps:
- Create a Linux VPS in the SiteHost Control Panel and connect to it via SSH.
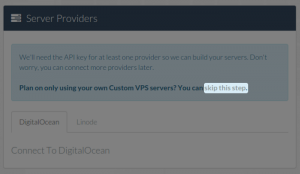
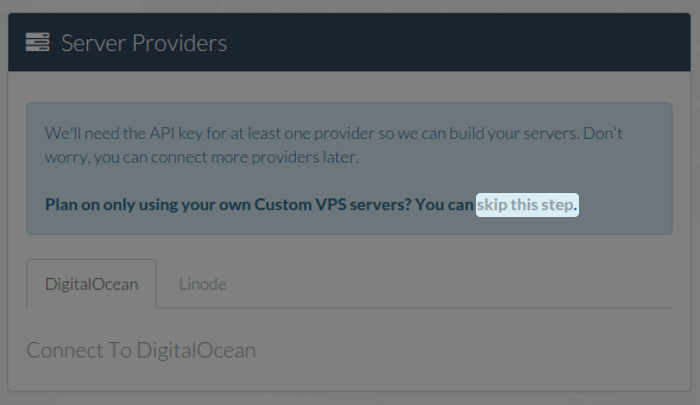
- Login to Forge and create an account if necessary. You MUST link your Forge account with Github to be able to start deploying applications. Forge has partnerships with some cloud providers but they are not required and you can easily use it with SiteHost. To do so just click on skip this step under Server Providers.
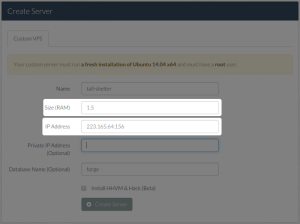
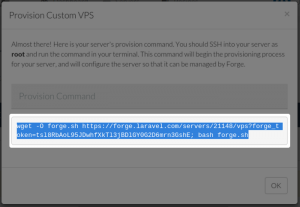
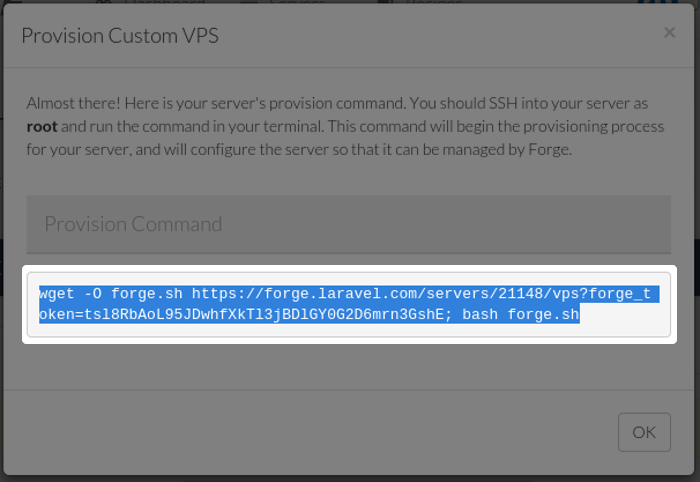
- You are now being asked to create a server. All you have to do is specify the IP address of the server. Hit the Create Server button, a popup will appear asking you to run a command on your server, copy/paste it into the terminal you opened earlier. Now wait until the server provisioning is finished.
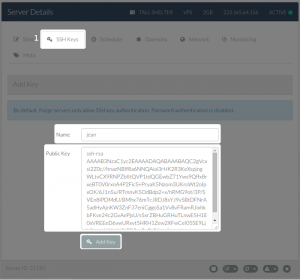
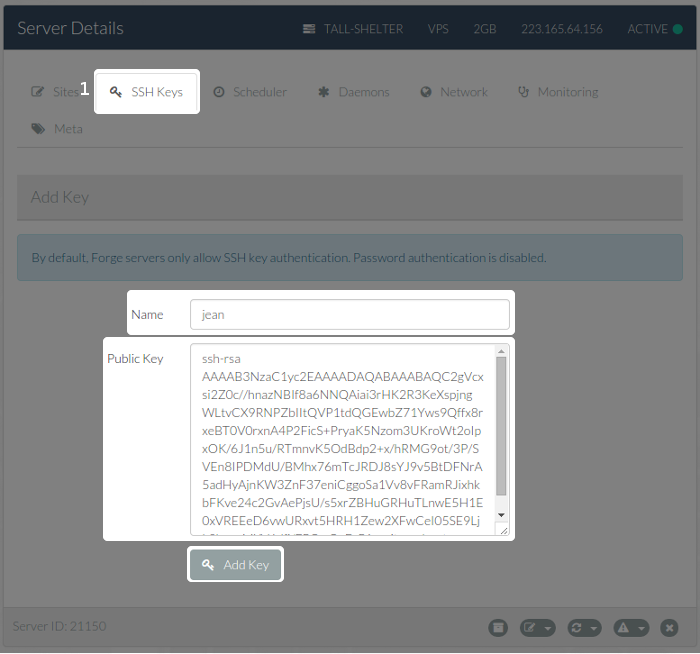
- You should now be redirected to the Server Page details. Here you can manage and configure your server. If you want to connect to the machine you need to click on the SSH Keys tab (1), copy/paste your public key and give it a name, then press the Add key button. Wait until your key is added and you will be able to connect with the user forge. Root access will have been disabled once the machine is provisioned by forge, but they would have sent you an email with the sudo password for user forge.
- On the top menu click on Sites, choose the default one of the server you just provisioned.

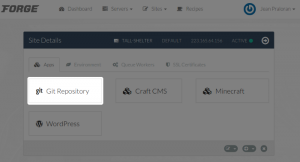
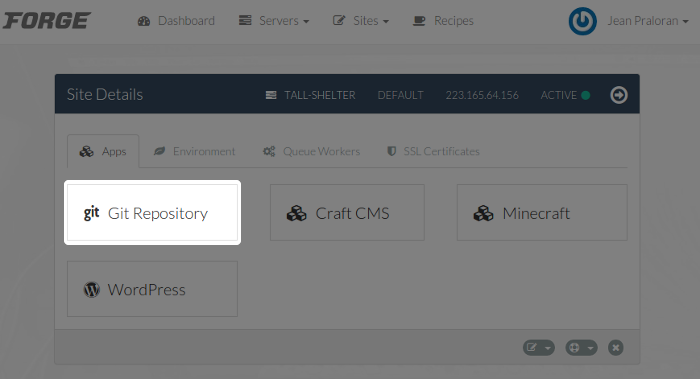
- You can now either deploy some preconfigured applications such as Wordpress or deploy your own project hosted in a Git Repository by clicking on the latter.
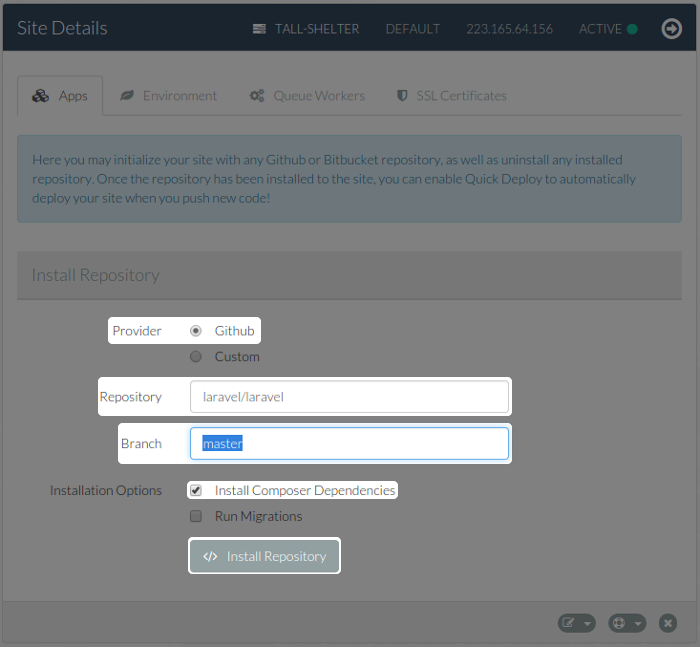
 You can either use a Github repo or your own Git repository. In this example we use a public Github repository, the syntax for the Repository is user/repo. Here we are deploying the repository laravel belonging to the username laravel (https://github.com/laravel/laravel). Specify the branch you want to deploy and tick the Installation Options you need. Hit the Install Repository button and wait.

- Once deployment is done you will be presented a new page with a couple of options allowing you to re-deploy for example.
- Open a browser and type your IP address in the navigation bar!


In case you have any trouble with Forge you can find documentation here: http://forge.besnappy.com/.