- Domains
- DNS Management
- Content Delivery Network
-
Cloud Containers
- Overview
-
Using Containers
- Creating and Managing
- Connecting to a Container
- Swapping the Image
- Domain Aliases
- Environment Variables
- Protected Environment Variables
- Backing Up
- Automatic Updates
- SSL Support
- Adjusting Execution Time Limits
- Upgrading Apache Image
- Renaming a Container
- Port Management
- Caching
- Cloning/Overwriting
- Restoring a Backup
- Production Mode
- Metrics Dashboard
- Accessing supervisord
- Container Deprecation
- SSH / SFTP Users
- Databases
- Volumes
- Custom Images
-
Technical Guides
- Create a NodeJS Container
- Creating a Service Container
- Working with .NET Core Web Containers
- Working with Node.js Web Containers
- Working with Umbraco Web Containers
- Deploying your application with git
- Python Container
- Enable Country-Level blocking in Cloud Containers
- Working with SQL Server Containers
- Working with the SilverStripe Caching folder
- Profiling a site using Xdebug on Cloud Containers
- Working with SilverStripe Containers
- NGINX Proxy for Service Containers
- Tuning PHP OPcache
- Deploying phpList on SiteHost Cloud Containers
- Deploying Mautic on SiteHost Cloud Containers
- Deploying n8n on SiteHost Cloud Containers
- Working with ModSecurity on Apache+PHP containers
- Low Disk Warnings & Upgrades
- Local Development
- Virtual Servers
- Dedicated Servers
- Private Cloud
- Cloud / Shared Hosting
- Email Hosting
- Monitoring & Bandwidth
- Account & Billing
- Developers
- SSL Certificates
- Networking
- AI Platform
Creating a Node.js Application Container
When creating a Node.js container there are a few ways to go about it, depending on your application and needs.
In this article we will cover setting up a standalone Node.js application with custom ports. We will also talk about using an Nginx proxy to handle web assets, images and resources when your Node.js application is used as a web service.
- When logged in to the SiteHost Control Panel, click the Containers module from the menu on the left.
- Click the Add Container option in the upper right corner of the page.
- Select Service Image from the navigation tabs.
- Choose the Node.js image and select which version you want to use.
- Choose a name for your container.
- Choose the Port number and Protocol conveniently. By default, containers on a server can access the Node.js container through port 8080. Tick the Publish check box if you require the port to be accessible from a remote location (not only on the server).
- Type in the SSH Username and SSH Password fields to create a SSH/SFTP user with access to the Node.js Container.
- Set Environment Variables filling in the Name and Value text fields.
- Click Deploy Container and check the deployment progress presented in the page header.
Once the container has been started, upload your files to the Container using your SSH/SFTP user. By default all Node.js containers will try and look for the file /container/application/app.js. If your Node.js application file is named differently or in another location, you can edit the configuration file located at /container/config/supervisord.conf changing the command line accordingly.
command=/usr/local/bin/node /container/application/app.jsRestart the Container using the Control Panel to apply the configuration changes.
Nginx Proxy
If your Node.js application is used as a web application, you may need a proxy in front to handle static assets, images and other resources. If that's the case, you can start by creating an nginx proxy just like any other web container.
Once you have created your nginx proxy Container, edit the nginx configuration file located at the path /container/config/nginx/sites-available/default. You should see the commented out lines as per the below:
#upstream nodejs44 {
#        server NODE_CONTAINER_HOSTNAME:8080;
#}
# proxy_pass http://nodejs44/;Uncomment the lines above, replace the NODE_CONTAINER_HOSTNAME with the hostname for your Node.js Container and save the configuration file. Reboot the nginx Container to apply the configuration changes.
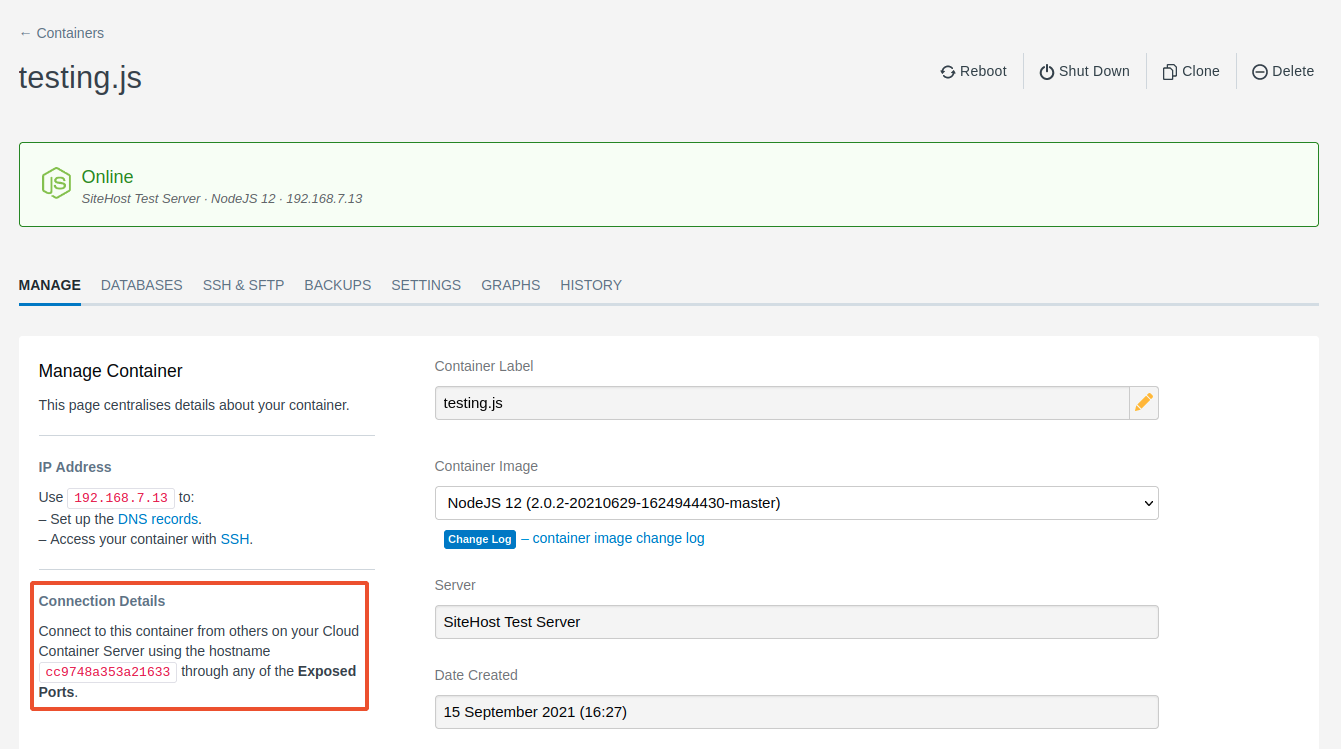
The hostname for the Node.js container can be found within the Container management page in the SiteHost Control Panel, note that the hostname is not the same as the container label.
Debugging your Node.js application
The standard output messages should be logged to the path /container/logs/supervisor/nodejs-stdout.log whereas the standard error stream should be logged to the file located at /container/logs/supervisor/nodejs-stderr.log.
If you apply changes to your application and can't see the changes live, try restarting the nginx proxy and browsing to your app using the incognito or private window.