Python Web Applications
If you're looking to serve a Python web application, such as one built with Flask or another web framework, you'll need some infrastructure around it to ensure that it works reliably and safely.
Container Setup
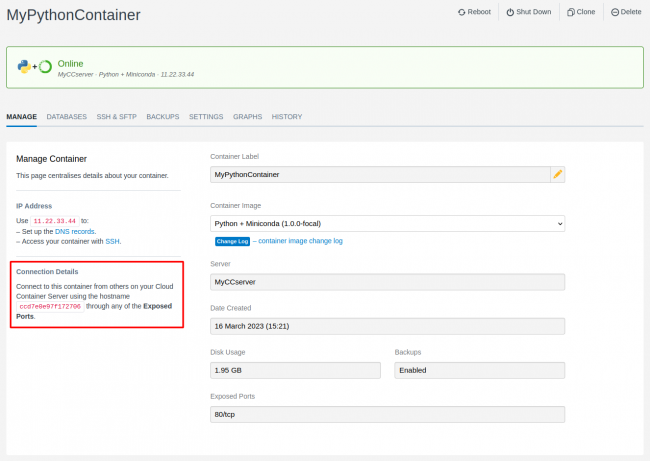
Our Python containers don't expose a port by default. If you didn't already specify a port when creating the container, you can add one under the container's Settings tab. For our example, we'll expose (but not publish) port 80:
NGINX Proxy
Because this is a service image, and not a web image, you'll need to configure the app with a separate NGINX proxy container to ensure that it serves as expected. This is a relatively simple process.
The NGINX Proxy container comes with a configuration example to connect to a Node.JS container, but the same principles apply. To adapt the example for a Python container:
- Edit the configuration file at
/container/config/nginx/sites-available/default, and uncomment the 'upstream' portion - Change the name of the upstream server from
nodejs44to something relevant to your Python container (for examplepyapp). You don't need to use your container name or labels here. - Change
NODE_CONTAINER_HOSTNAME:8080;to the name of your Python application container (shown in the SiteHost CP dashboard for that container, something likeccd7e0e97f172706):
- Change the
:8080to match whatever port you've opened (e.g.:80- shown under 'Exposed Ports' in the above screenshot). - Uncomment the example line that says
proxy_pass http://nodejs44/; - Change
nodejs44to again match your upstream server name - using the same example, it should look likeproxy_pass http://pyapp/;.
From your SSH session, run nginx -t to ensure your changes are valid (you want to see this line: nginx: the configuration file /etc/nginx/nginx.conf syntax is ok). The expected output should look something like this:
The last two messages shown, permission denied and configuration test failed are safe to ignore. This happens because the SSH user in the container does not have permissions over the NGINX service. The important bit is that if the syntax is ok, it should now be safe to restart the NGINX Proxy container to apply the new configuration.
It's normal for functions like this to fail when using Cloud Container SSH functionality. This is because your SSH session is actually within a separate container, and so it doesn't have access to everything a direct SSH user might do - but this allows us the flexibility to configure multi-container SSH users, etc. Read more about our SSH user sessions in our KB.
Python WSGI/ASGI Server
General Considerations
There are a number of WSGI (Web Server Gateway Interface) and ASGI (Asynchronous Server Gateway Interface) middleman servers designed to serve Python applications. The best known option, also recommended by most Python frameworks, is Gunicorn. There are plenty of tutorials that outline how to configure Gunicorn (or any other gateway), but there are a few things to keep in mind:
- If you're running an application that uses asynchronous calls or function definitions, you should use async-capable workers (such as Uvicorn) with Gunicorn as the master process.
- Gunicorn will, by default, serve a distinct application per worker instance. This means that if you're using large datasets that are loaded into memory (such as a large language model), you will probably need to configure shared memory.
- If you're using a database, especially using an ORM such as SQLAlchemy, ensure that you're doing this in a thread-safe way. Django does this by default, Flask-SQLAlchemy solves this problem for you, and you can always use something like SQLAlchemy's
sessionmakerto ensure that sessions are thread-local.
Basic Example Deployment
Generally, you should follow the deployment instructions for your specific framework to configure your gateway server. An example step by step deployment for a very simple Flask app is included below.
We'll assume that your application is in /container/application, a file named myapp.py and the Flask module is called app. We'll also assume your Conda environment is called flaskapp. An example myapp.py might look like this:
from flask import Flask
app = Flask(__name__)

@app.route('/')
def hello_world():
return 'Hello world!'- SSH into your Python container and activate your Conda environment (
conda activate flaskapp) - Install the gateway package(s) you need alongside the framework, for example
conda install gunicorn flask - Edit the
/container/config/supervisord.conffile. Either uncomment the example[program:pyapp]block, or create a new one with the settings you want. - Make sure that your block is executing in the root directory for your application. We'd recommend leaving this as
/container/applicationand setting your app up in there. - Ensure that the command for your Supervisor program first activates the Conda environment using source, NOT conda (
source activate flaskapp), and then runs your application via your WSGI server (python -m gunicorn --workers 2 --bind 0.0.0.0:80 myapp:app). An explanation of what this does:python -m gunicorntells Python to load the Gunicorn module.--workers 2tells Gunicorn to load up two service workers. You can change this based on available resources.--bind 0.0.0.0:80tells Gunicorn to listen to all network traffic on port 80. If you've exposed a different port, change this to match.myapp:apptells Guncorn to look for the Python file namedmyapp.pyand loadappfrom it (in our example,app = Flask(__name__))
- Chaining these into a single runtime command would make the line look like this:
command=/bin/bash -c "source activate flaskapp && python -m gunicorn --workers 2 --bind 0.0.0.0:80 myapp:app" - Make any other changes you want to the supervisor config, and then save them.
- Reload supervisor, either with
supervisorctl reloador by restarting the container. - Check the URL that your NGINX Proxy is listening for. Your example app should be live!
For any real-world deployment, you should follow the recommended security & safety practices for your gateway and framework.

